Today, I am going to show you 3 projects I did down here that saved me tons of money! Who doesn't like that?
1. Spray painted refrigerator.
What? That's right! I spray painted our little under bar fridge that was bought in 1980 and had the brown wood grain color to prove it!
I figured I didn't have anything to lose and if turned out horrid I would just go buy another one. I taped up the handles, primed with Kilz, and then hit it with Krylon Fusion spray paint in Metallic Shimmer (2 coats). Easy as pie and less than an hour project including dry times! I think it was 100% worth it and no one had any idea it was spray painted. We are talking $5 rather than going to spend $150 on a new one! Good stuff!
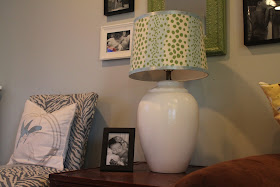
2. Repurposed Goodwill Lamp and Walmart Shade.
This was $5!!!! Yes!! They actually had a few to chose from but I wanted one that could take up a good bit of visual space on a big side table. I was drawn to this lamp from Ballard Design, but the $169 price tag seemed completely unrealistic to me! |
| Pretty huh! Here is a link if you don't feel like doing it yourself. |
The shade was just a little trickier but not much! I found a $14.99 drum shade at Walmart. I had a scrap of fabric left over from pillow making and used the plastic protective covering from the lamp shade as a template, traced it onto my fabric, and cut that out leaving an extra 1/4 inch or so around all the edges. Next, just pin the fabric onto the shade, cut off any excess, and slowly glue (I used hot glue) the top edges all the way around. Lastly cut two lengths of matching ribbon to hide your raw edges and glue those down. It turned out pretty close to perfect... close enough for me anyway! One thing I learned is to line up the seams of your new cover with the existing seem on the lampshade. Otherwise, when the lamp is on you will see both seams.
I'm kind of in love with it and my total price including the $14.99 Walmart lamp shade was still under $30. A far cry from the $169 price tag on the Ballard Design gourd lamp!!
3. Gallery Wall.
I have been pinning tons of gallery walls on Pinterest! But, to price all new frames, mats, etc was gonna be a little ridiculous. So, I gathered up tons of existing frames and a few other pictures and mirrors from around my house and got out... you guessed it... the spray paint! I wanted to stick to the green, black and white so all I did was lay out my design and decide which frames to paint! I even painted some mats and it worked beautifully! Hopefully the glass pops out of your frames (some of mine didn't) which makes it very easy work. Spray prime, spray paint, hang. Easy as that! I am left with a cohesive gallery wall that I think highlights the pictures which is exactly what I wanted!
There you go... 3 incredibly easy money saving projects that absolutely anyone can do!
Full room reveal this week sometime!
Kandi


Super cute lamp shade and your gallery wall has inspired me to try to do the same on our basement wood paneling wall -- I have paint matched to a set of baskets but unfortunately it's in a can, not spray paint, so it will be a bit more tedious but I love the effect. Need to print out some black & white photos! :-)
ReplyDeleteMy green paint on the frames was in a can too! It actually ended up not being as bad as I thought... I put it off forever! As long as the glass will pop out of the frame its fast and easy.
ReplyDeletethe fridge is an outstanding antique!
ReplyDeleteThe Marketing King specializes in high-impact marketing for the iGaming sector, helping platforms turn traffic into loyal players. With a focus on custom strategies, regulatory compliance, and performance-driven results, we support casinos and sportsbooks at every stage of growth. When you need marketing that delivers—not just clicks, but conversions—The Marketing King is the name operators trust.
ReplyDeletehttps://themarketingking.org/